Συχνές Ερωτήσεις
Γενικές ερωτήσεις
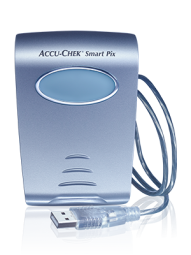
The Accu-Chek Smart Pix device reader is compatible with all Accu-Chek meters and pumps that offer infrared (IR) data transfer functionality.
Once your Accu-Chek Smart Pix device reader is plugged in and working, you can find version information at the top left of your screen.
When upgrades are available, you can download them from the Accu-Chek Smart Pix page on our Web site. We will also include instructions for upgrading.
If the Accu-Chek Smart Pix device reader fails to appear on the computer as a drive:
- Check that the blue LED light on the front is lit.
- Check whether your computer and operating system satisfy the system requirements for the Accu-Chek Smart Pix device reader system.
- Check to make sure the USB connector is firmly plugged into the correct socket on the computer.
- If the Accu-Chek Smart Pix device reader is still not recognized as a drive, plug the device into a different USB socket.
If the Accu-Chek Smart Pix device reader fails to emit any display signals and if the above tests don't solve the problem, try testing the device on a different computer, if available. If there is still no sign of operation, the device may be faulty. This also applies if there are error signals flashing in the center of the display that are not associated with data transfer. Please contact Roche Diabetes Care.
The Accu-Chek Smart Pix device reader reports potential errors during data transfer and use by causing the center display section 8 to flash. Here's what you can do:
- In the browser navigation, click the Read Device button. The center display section should flash slowly now, indicating that it is actively searching for devices and that it is ready for data transfer.
- If the error signal continues, you can unplug the Accu-Chek Smart Pix device reader and plug it back in again. Disregard any Windows error messages about removing the data medium.
Try repeating the transfer again. If this error signal occurs again, check the following:
- Has the meter been properly prepared for data transfer?
- Is there anything obstructing the signal between the device IR port and the Accu-Chek Smart Pix device reader? Is the device too far away?
- Is there any interference from bright lights or sunlight?
Often, in the case of error messages associated with data transfer, the issue is interference with data transfer, or a problem with the meter or insulin pump.
While you can view your results at your computer and e-mail a report, you can't store the readings or manipulate the data, as with other Accu-Chek applications.
You can combine results from up to 3 blood glucose monitors at the same time, and have all the information appear on 1 easy to read graph.
The Accu-Chek Smart Pix device reader uses infrared technology to "beam" data from an Accu-Chek blood glucose meter or insulin pump when it is placed in front of the device reader. This simple connectivity means greater convenience and faster downloads for you.
There's no need to load software. Everything you need is already within the Accu-Chek Smart Pix device reader. Just plug it into a USB port to get started.
No. This system requires the Windows® 2000, Windows XP, Windows Vista® or Windows 7 or 8 operating system.
The device simply plugs into any available USB port. Just plug it in and it's ready to go.
The Accu-Chek Smart Pix device reader is compatible with Accu-Chek meters and pumps that use infrared (IR) data transfer.
You can print out reports showing precisely what your healthcare team wants to know. By letting you set personal targets, time ranges and report preferences, the Accu-Chek Smart Pix device reader gives you just what you choose.
The Accu-Chek Smart Pix device reader collects data from your blood glucose tests and insulin pump doses. By looking at all of this information at once, you can see how your efforts at managing your blood glucose are progressing.

